Before you start
This guide assumes you already have a Counselling Buddy account, and that your subscription includes the Billing & Payments feature.
The billing and payments feature isn’t included in all pricing plans, so it is important to check our pricing page to understand the features that your plan includes. At the time of writing, Billing & Payments is included in Premium (£19.99/month) and above.
If you are new to Counselling Buddy, and haven’t worked through the basic setup yet, we recommend following our Getting Started guide via the below link.
Step 1: Link your Counselling Buddy account to Stripe
As part of setting up Billing and Payments, you need to either open a new Stripe account, or link your existing Stripe account. You do this inside Counselling Buddy (so do not need to visit Stripe directly).
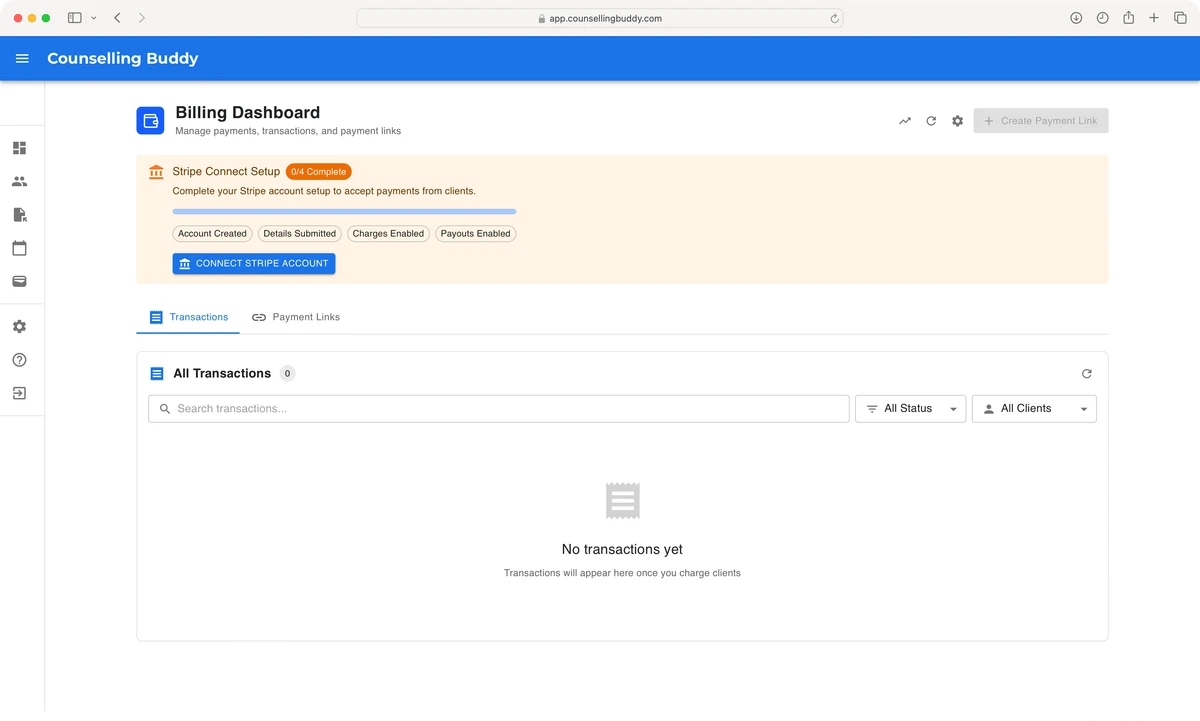
To get started, you need to navigate to the billing dashboard (found via the wallet icon in the left hand side menu on Counselling Buddy).
Good to know: You only need to connect your Stripe account to Counselling Buddy once, after that it just works!
If you haven’t already complete the setup, you should see a blue Connect Stripe Account button towards the top of the page,
as well as a list of outstanding tasks. Don’t worry, you will be walked through the steps to complete each of the tasks on
Stripe’s website once you have clicked the Connect Stripe Account button.
The below image shows what you should see if you haven’t already completed setup, when you reach the Billing and Payments dashboard.
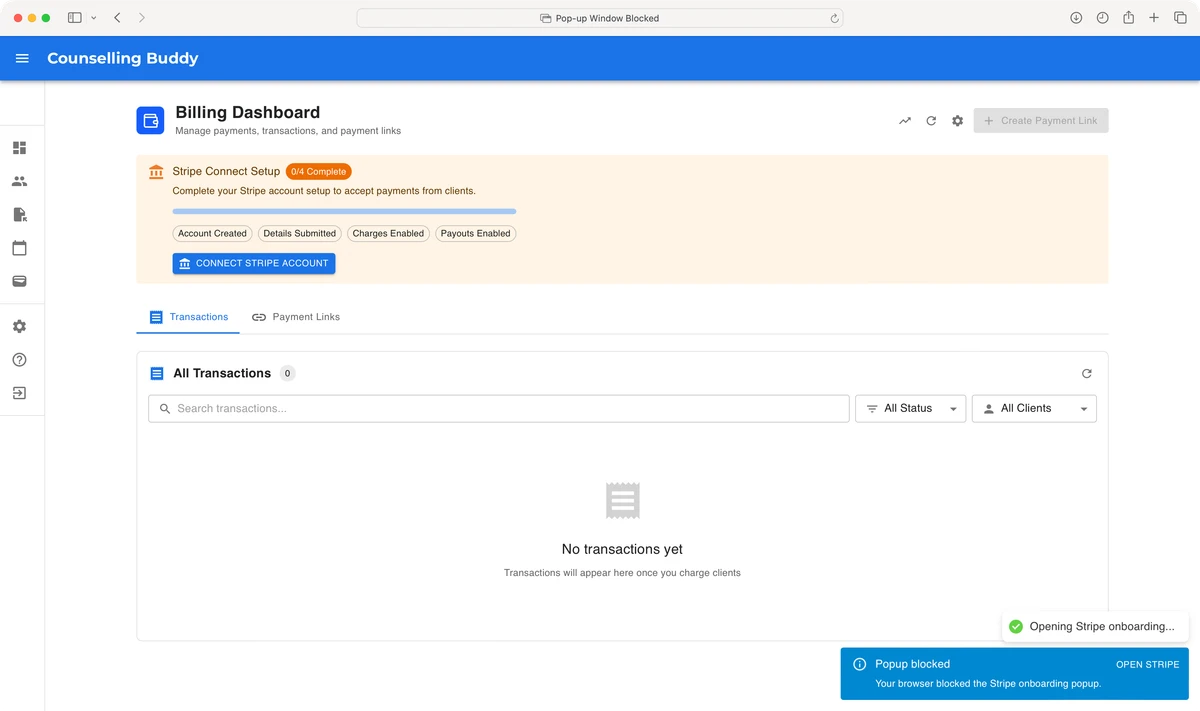
When you click the Connect Stripe Account button, your browser may block the new tab from opening. If it does, you
should see a popup in the bottom right corner letting you know that the Stripe popup was blocked, providing you with an
Open Stripe link.
Clicking the Open Stripe link should successfully take you to Stripe in a new tab.
If your browser didn’t block the popup, you can ignore this step.
Completing the Stripe setup
The exact page that you see when you reach Stripe may vary, depending on whether you have used Stripe before. You will
know that you are in the right place because the left-hand sidebar will look like the example in the below image, and
the address bar will show: connect.Stripe.com

If you already have a Stripe account, it should just ask you to login, verify yourself and select the profile you wish to link with Counselling Buddy.
If you do not already have a Stripe account, you will be asked for some details including business type, (eg. Sole Trader) business details and bank account details (for the account that your funds will be paid out into).
Once you have successfully completed all the necessary steps on the Stripe page, it will automatically send you back to Counselling Buddy.
Step 2: Configure your billing settings
Once you have completed the Stripe setup, the most important thing is to review and update your settings. This controls how Counselling Buddy handles payments for you, allowing you to set things such as whether you would like clients to automatically receive payment links ahead of their sessions, etc.
Good to know: There are a lot of settings to choose from, and it can feel a bit daunting at first, which is why we added a quick setup wizard.
If you choose to use the Quick Setup Wizard we recommend that you still have a flick through the settings, so you see the features that are available to you. We try to make it as clear as possible, at a glance, what each setting does. However, if you don’t know which ones to choose, and the Quick Setup Wizard wasn’t enough, you can contact our support team for help.
What if I do not want to use any automatic billing features?
Good to know: If you do not want to use any of Counselling Buddy’s automatic billing features, you do not need to
use the Quick Setup Wizard, nor do you need to follow the rest of the steps in this guide. Instead, click on the
How to collect payment dropdown box, under the Payment Collection section, then select Manual Payment Only.
Scroll to the bottom of the page and click Save Changes. You can change this at any time, and it will prevent any
automatic billing from taking place, without changing any other settings. You can change this at any time, and your existing
billing settings will not be changed.
This can be used if you are taking time off, and want to be sure no automatic billing activities are processed whilst you are away, without resetting your billing settings or manually checking every setting.
Using the Quick-Setup Wizard
You can use the Quick-Setup Wizard to change the key settings on the fly by following these steps:
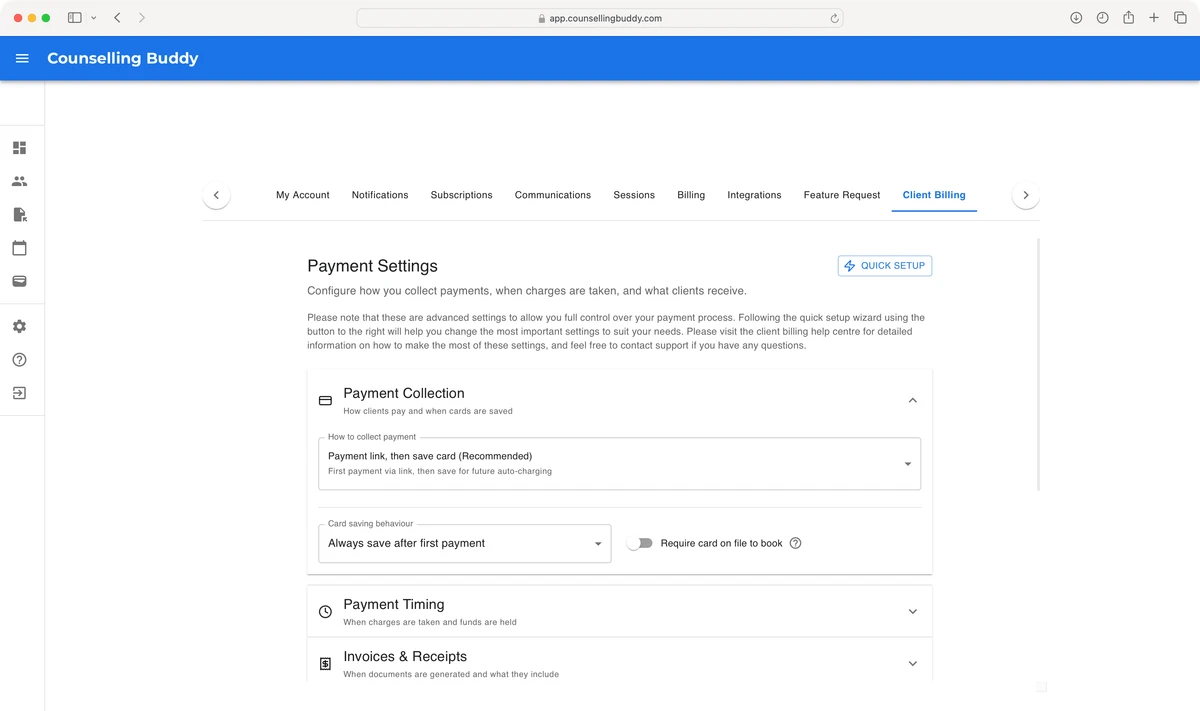
- Navigate to your Settings, and go to the
Client Billingtab (pictured below)
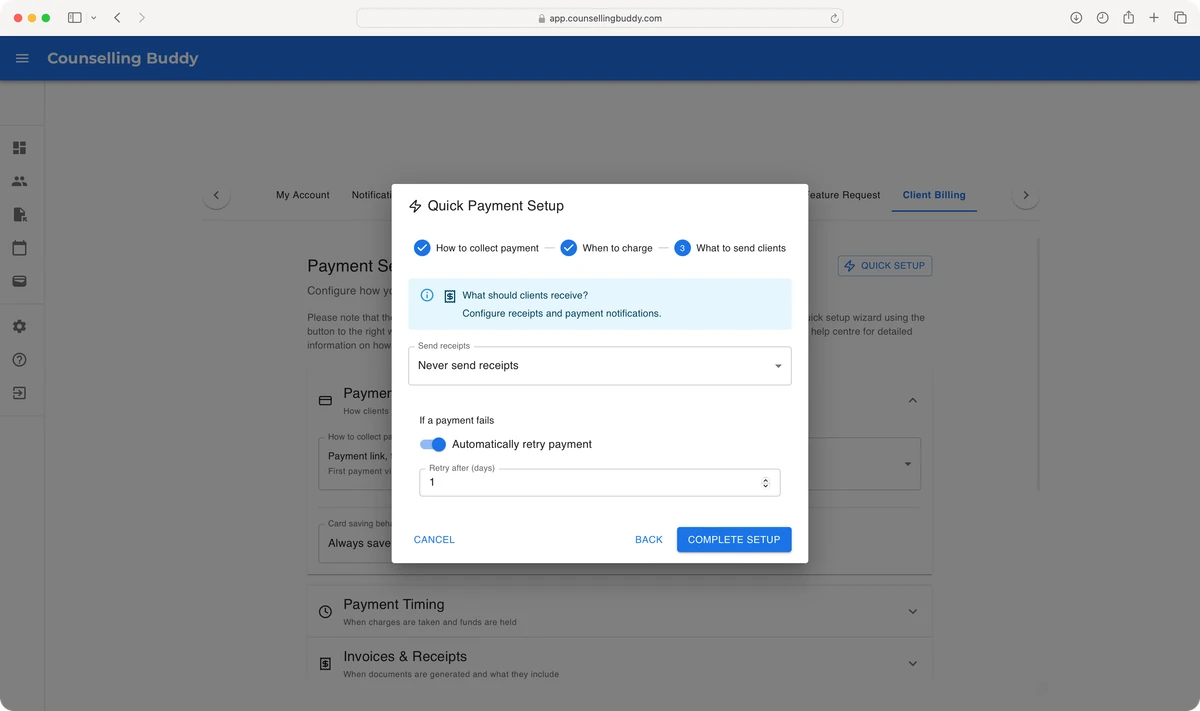
Opening the Quick-Setup Wizard
Once you reach the Client Billing tab, you should the Quick Setup button to the right.
Click the Quick Setup button to open the wizard, then you should see a popup like the one in the below image.
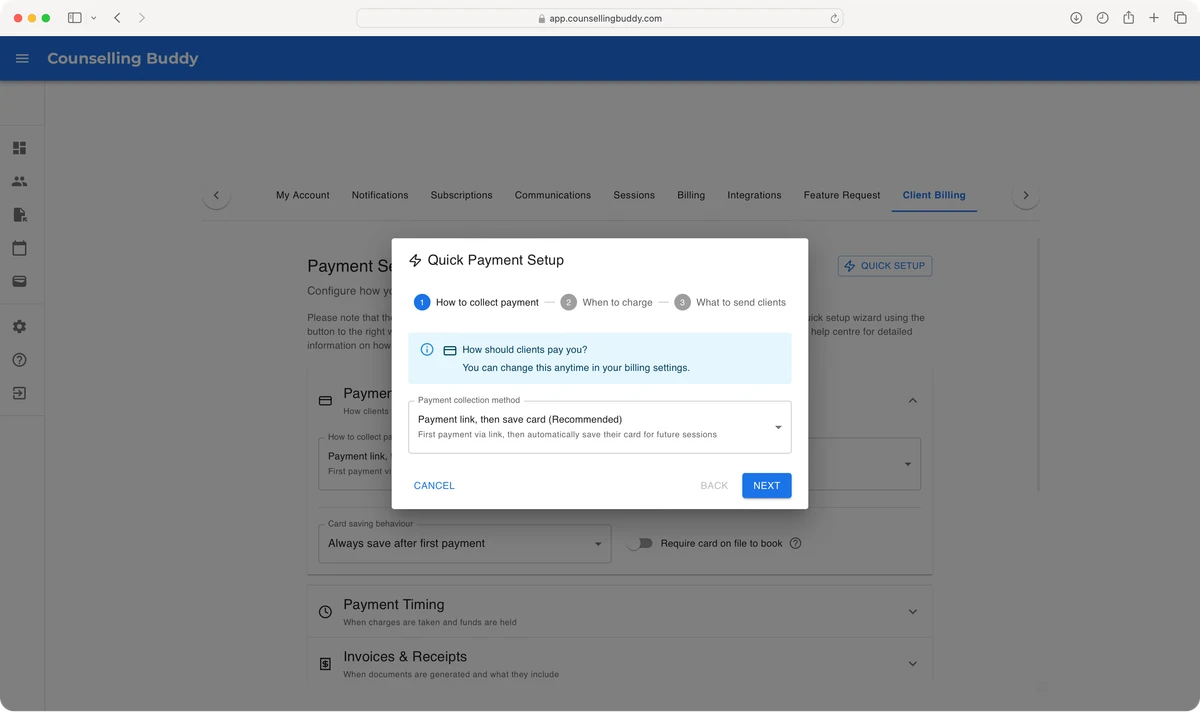
The first page of the Quick Setup Wizard asks how you want your clients to be charged, you have multiple options which will work in different ways:
- The recommended payment method: Payment link, then save card.
- This method means that when a new client pays via payment link, their card details are saved so that they can be automatically for future sessions.
- Send payment link each time: client receives a payment link for each session.
- This means that, even if a saved card is available, payment links will be sent. For example, if you enable auto-billing (which will be explained on the next page of the Quick Setup Wizard) clients will always be sent a payment link, never charged automatically.
- Auto charge saved card.
- This option will charge the saved card if present, or send a payment link if not. This option will not save the client’s card when they pay for the session via payment link.
Controlling when Billing is performed
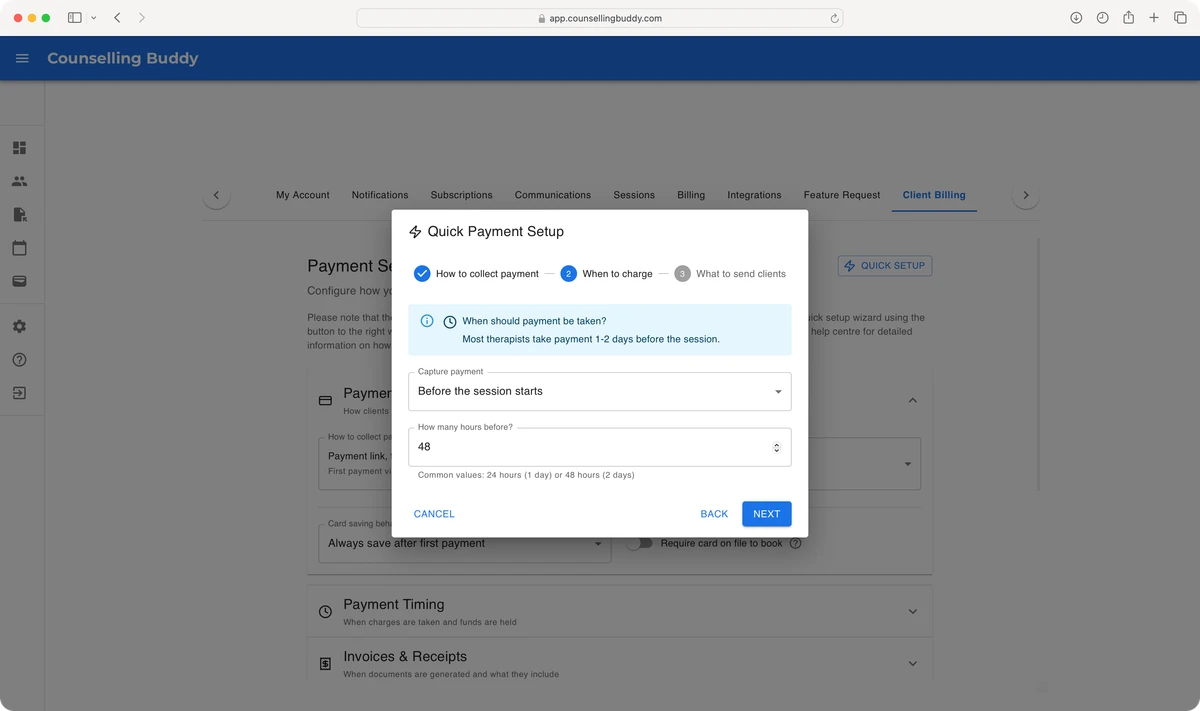
The second page of the Quick Setup Wizard lets you choose when you want automated billing actions to take place.
If you don’t want any billing actions to be automated, please see the section What if I do not want to use any automatic billing features? above.
This page allows you to select from the below options:
-
Before the session starts
- This option allows you to specify how long, in hours, before a session you want billing to take place. Most frequently used with a value of 48 hours, to match what many therapists have as their minimum cancellation period.
- This option is a great way to align billing with your minimum notice for cancellations. It is also the most popular option to be used when automatically charging saved cards, since clients are automatically billed when their cancellation period ends.
-
Immediately when booked
- This option processes billing immediately when you book a session. Be aware that this may not be the best option when scheduling sessions in advance, since clients would be charged (or sent a payment link) immediately when you schedule the session on Counselling Buddy.
- This option is typically chosen by users who only send payment links, since it means the client can pay whenever they want to.
-
After session completes
- This option processes billing at the scheduled session end time.
- This is a great choice if you use payment links and prefer clients to pay after sessions, or automatically charge saved cards, and don’t want to take the money from the client in advance.
-
I’ll capture manually
- This option disables automatic billing processing for your sessions, meaning that you would need to send payment links to your clients manually, or collect payments manually outside Counselling Buddy.
We do not recommend that you use option 4. If you want to disable automatic billing, you should instead follow the instructions in the above section
What if I do not want to use any automatic billing features?